Instructions for Sponging Off Paint - Roller Application

The basic sponging off paint technique
Sponging off works best in oil-based mediums, but if your surface is small (for example, your are painting a powder room, or the walls just below a chair rail) and you are able to move fast, a water-based glaze can work as well.
Glaze can be applied with a brush, dabbed on with a sponge, or it can be rolled on.
This tutorial will have you roll it on, to produce the most subtle effect of the 3 possible application methods - the finish will resemble the soft texture and color play of suede.
Tools and Materials
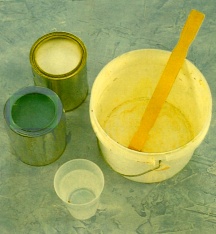
- Paint tray + 2 liners for the base coat and glaze
- Roller + 2 covers for applying the base coat and glaze
- Synthetic bristle brush for cutting in the base coat
- 2" foam paintbrush for cutting in the glaze (if oil-based)
- 3" brown paper painter's tape for masking off edges and corners
- Paint for the base coat (alkyd or latex semi-gloss)
- Glazing mix - 1 part paint (latex or alkyd), 2 parts clear glaze (acrylic or alkyd), 1 part solvent (water or mineral spirits)
- Bucket of solvent for rinsing the sponge (water or mineral spirits - depending on whether your glazing mix is water-based or oil-based)
- Mixing bucket for making the glaze recipe
- Measuring cup for formula consistency
- Large sea sponge for removing the glaze
- Paper towels or rags for cleanup
- Latex gloves
- Stir sticks
Preparation
Apply the base coat and let it dry - at least 1 day for latex, and 2 days for alkyd paint.Mask the walls, ceiling, and baseboard adjacent to where you'll begin.
In a plastic container, mix the glaze and pour some of it into the roller tray.
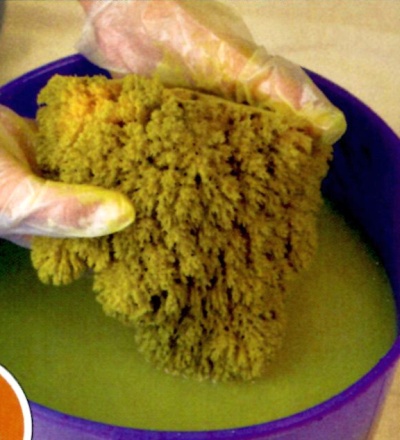
Dip the sponge in the solvent and wring it out thoroughly.
Application
1) Using the brush, cut in the glaze 2' along the ceiling and into the corner where you'll begin - if your glaze is oil-based, and 1' if working with a water-based medium.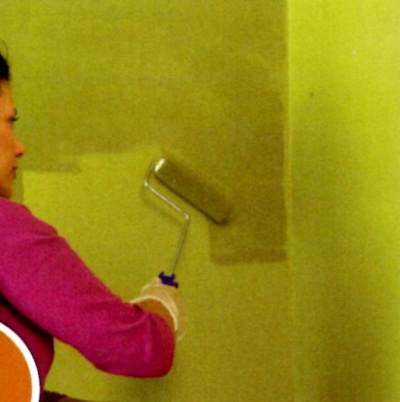
Load the roller with the glaze and roll off excess on the tray. Apply the oil glaze over a 2x2 area of the surface.
For water-based glazes, work in even smaller, 1x1' sections to keep a wet edge.
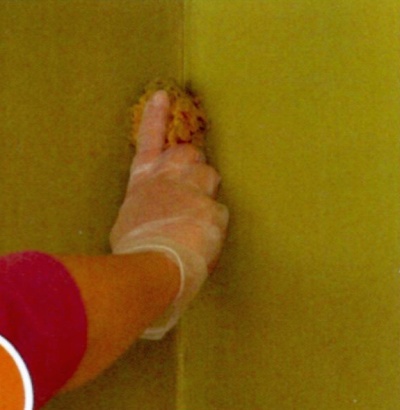
2) While the rolled-on glaze is still wet, press the clean, damp sea sponge into the glaze, removing some of the glaze and revealing the base coat color underneath.
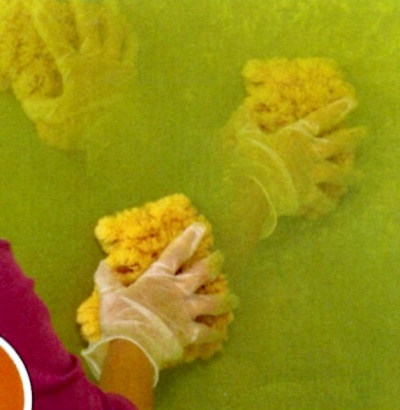
Lift your hand, rotate your wrist, and slightly reposition your arm. Press into the glaze again. Continue removing the glaze, creating a larger area.
Change the portion of the sponge that you press into the glaze, so that no area of the sponge becomes oversaturated.
When the sponge is no longer removing glaze, rinse out the sponge in the solvent, wring it out and continue sponging off the glaze.
Because the clean sponge will remove more glaze, resume pouncing from the outside edge in, to blend gradually.
TIP: if you rinse the sponge after every few pounces, much more of the base coat will show through. However, to do this successfully, you'll have to work much faster.
3) Repeat steps 1 and 2, overlapping the previously sponged area slightly with a rolled-on layer of fresh glaze, and dabbing it off with the sponge.
When you reach the corner, scrunch up the sponge as necessary to remove the glaze (or use a small piece of sponge).
NOTE: This method is faster and easier when done by two people - one who applies the glaze, and one who takes it off.
But timing is important here: the glazer shouldn't get too far ahead of the sponger, or the paint will reach snap time too early (which means starting over).
On the other hand, you mustn't remove the glaze immediately, or what remains on the surface will run.
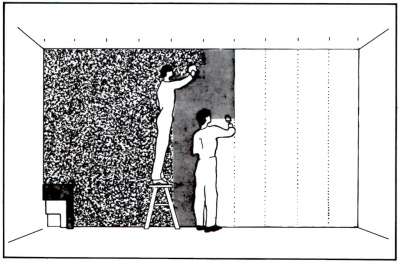
Experiment with the technique to gauge the timing and the area you have to cover, so that you can be comfortable working it.
Remember, the glazing partner can work much faster than the one who is working the "dry" sponge.
Also, you may find it more efficient to use 2 sponges - while you are dabbing with one, the other is being washed by your glazing partner, who then hands it to you as soon as you need a fresh one.
...and this is what you get for this double duty (or your own efforts) - a finish that looks smoother and more subtle than additive sponging on.
Return to Sponging Off Paint Techniques.
Recommended:

Recommended:


