Easy Tutorial for Sponging Off Paint - Sponge Application

Cloud-like sponged off painting effect
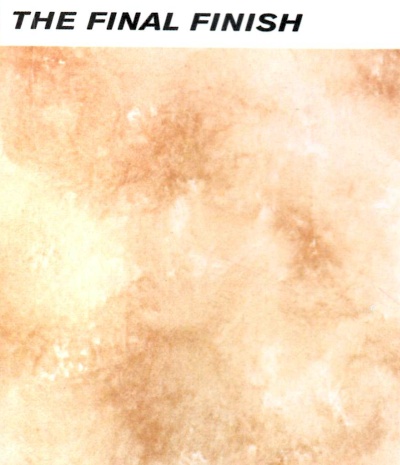
This version of subtractive sponging produces a finish that looks dramatic and ethereal at the same time.
The result of this particular technique is more subtle than sponging on, but has more depth than the other sponging off application methods.
It's important that the colors you choose here contrast well, and it's better to start with the lighter color as the base.
Like sponging on, this technique can also be done in several colors, but keep them closely related not to overdo the drama.
In the tutorial below, a light brown glaze is applied over a warm-white base coat.
Preparation
You'll need the same tools and materials as for the roller application method, plus 1 extra sponge (also use the same recipe for your glazing mix).Follow the instructions below after you've rolled on the base coat, allowed it to dry for a day or two, and protected all the surfaces not to be painted with masking tape.
To start, pour some of the glaze into a tray, put on your rubber gloves and dampen your sponges with solvent (water or mineral spirits - depending on the recipe you are using).
Instructions
1) Dip one of the sponges into the glaze mixture, and apply the glaze by firmly dabbing and pressing the sponge to the surface (unlike in additive sponging, no precision or care are needed here - you can be much more cavalier with your application).
Make sure each stroke touches and occasionally overlaps the previous stroke. Cover a 2'x2' section and let about 20 percent of the base-coat color to show through.
Use a foam brush to cut the glaze into the corners, along the ceiling and trim as you go.
2) While the applied glaze is still wet, lift it off using a clean, damp sponge. Repeatedly press the clean sponge into the glaze and lift off, removing some of it and revealing the base coat color underneath.
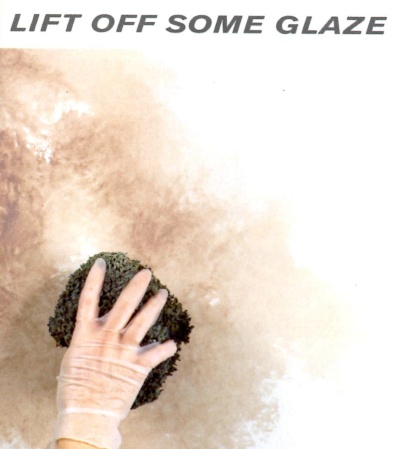
Vary the painted print by rotating the sponge each time you lift it to avoid an identifiable pattern. Occasionally drag the sponge over the glaze lightly, or swirl it around on the surface to meld the colors together.
Change the side of the sponge that you press into the glaze so that no area of it becomes oversaturated, and keep the sponge clean and damp by frequently dipping it into the solvent and wringing it out.
3) When you reach the corner, scrunch up the sponge as necessary to remove the glaze (or use a small piece of sponge).
But don't try to remove the glaze from the corner in one pass when you begin. Instead, work in and out of the corner as an extension of your 2x2' working area, for a better blended pattern.
Work quickly not to let the leading edge(s) reach snap time or dry out.
4) Repeat steps 1-3 until you've covered the entire wall.
The final finish should show about 10% of the base coat color, and have a cloudy, yet textured appearance.
NOTE: You'll get better results with 2 people working side by side: one to apply the glaze, and one to remove it.
But if working alone, you need to establish a working pattern:
- Work in strips no wider than a comfortable arm's reach so that you do not have to overstretch.
- The paint should not cover such a wide area that it becomes dry and unworkable before you can lift it off with the sponge.
- As a general rule, you should start to sponge off within 5 minutes of applying the glaze, but if the weather or the room is warm, the glaze will dry much more rapidly.
- Do not delay between finishing sponging off one strip of wall and applying the glaze to the next. This would result in a dark demarcation line between the two adjoining areas.
- If you find that the sponged on glaze is drying too quickly, do not sponge right up to the edge, but leave it as brushed on glaze until you get to it.
Return to Sponging Off Paint Techniques.
Recommended:

Recommended:


