Stenciled Ceiling / Light Border in Dining Room
by Daria
(Philadelphia, PA)

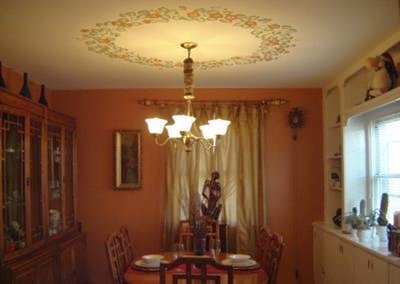
Painted stencil pattern around the ceiling light
This was done almost entirely with stencils and three colors of paint: the sage green color and two shades of red. It took about 1 1/2 hours (with one worker and my 8 year-old son helping a little bit) from start to finish. We traced the inner boundary of the circle on the ceiling with pencil, and then just started stenciling.
I got the inspiration for this from the wallpaper in the house where my grandmother lived when I was a child. I wanted a similar fruit motif, but only in an isolated area of the room.
The red colors that we used in the stenciling coordinate very well with the red on the walls, and we felt that the green provided a pretty contrast color.
The biggest tip that I can offer for painting a ceiling in any manner is, of course, to make sure that you use drop-cloths to cover EVERYTHING below before you start painting!
Even though stenciling/sponge painting doesn't use as much paint as, say, painting a wall or painting an entire ceiling, you don't want to take a chance with your precious linens and valuable furniture.
Use old sheets, towels, or drop cloths from the Home Depot and cover ANYWHERE that paint might fall! You never know when you're going to drop something, and bam!
Click here to share your ceiling painting idea and see your name in lights!
|
||
|
||


