Tips and Tricks
for Sponge Painting Walls
Sponge painting walls is not exactly rocket science - in fact, it is one of the first techniques that newbies to decorative finishes try.
Still, there are certain things you should know that not only can help the painting process go smoother, but can even make or break the final effect.
General

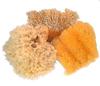
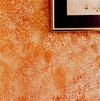
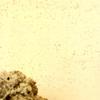
- The best tool for sponging is a natural sea sponge. Kitchen and bath sponges are difficult to work with when removing glaze (especially if you are a beginner), and impossible to use for applying it evenly.
- The size of the sponge you buy should be determined by the area that you wish to tackle, although anything bigger than the size of your hand can become unmanageable.
It's a good idea to have 2-3 sizes in your toolkit, including a tiny 2" one to use in corners.

- Never use a sponge dry for applying or removing glaze - always dip it in
solvent (water or mineral spirits - depending on your glaze recipe) and
wring it out well before using. If the sponge is new, squeeze it in the
solvent several times until it becomes loose and pliable. During your
work, wash the sponge as soon as it starts getting stiff.
- If you
need to take a break from sponge painting the walls (even for a couple
of minutes), make it a habit to drop your sponge(s) into a bucket of
solvent first. That way they won't dry out and become useless.

- Always
use a measuring cup and stick to the recipe - that way, if you run out
of the glazing mix in the middle of your project, you'll be able to
quickly and easily reproduce the formula, and continue the finish where
you left off without any difference in color or transparency.
- Don't
let any water or mineral spirits get on the freshly sponged surface -
it will leave white spots/marks and may ruin your finish (small spots
can be camouflaged, but streaks are hard to touch up inconspicuously).
- See if you can get away without applying the base coat. If your existing wall paint is in a good condition, you can save a step by sponging on or off right over it (but of course, it will limit your color options).
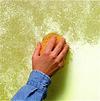
Sponging On

- Natural sea sponges come in round and flat shapes, but flat ones work best for sponging on purposes.
If you can't find a flat one, you can always cut a round sea sponge in half with scissors, and use the flat side for dabbing glaze on (don't be afraid to also trim your sponge or texturize it some more, if needed). - The size, shape and number of the pores in a sponge are the main factors that determine the imprint it will leave - keep this in mind when shopping for a sponge for your project.

- The most challenging part of sponging on is maintaining the same
sponge pressure throughout the entire process, and re-loading the sponge
at just the right time. To prevent an uneven, blotchy pattern with
faded and overly saturated sponge marks, reload the sponge whenever the
impressions begin to lighten. Also, use a lighter hand after refilling,
and more pressure as you go on.
- Give the sponge a 1/4 turn before
you make each stroke, and turn your hand from side to side - to avoid
any tendency to create an identifiable pattern. But do it in the air and
be careful not to rotate, drag or slide the sponge on the surface, or
the glaze will smear.

- Don't jump around dabbing at random
when sponge painting walls, or the effect will be uneven. Instead, work
consistently across the surface - complete one 2'x2' section at a time,
then move on. When you use a sponge correctly, you shouldn't see the
individual strokes of glaze on the surface.
- If you make a
mistake, correct it immediately - use a clean damp sponge or a damp rag
wrapped around your finger to clean up any drips or smudges. If the
mistake has dried already, use the base coat paint color to make touch
ups with a small piece of sponge or a blunt artist's brush.
- To soften or tone down a sponged surface that's turned out too busy or bright, let the glaze dry completely. Then, using a sponge, cover the surface with a layer of very diluted colored glaze (twice as thin - reuse one of the finish colors), and immediately wipe it off with a clean sponge.
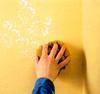
Sponging Off

- The most challenging part of sponging off is moving quickly, in order to maintain the wet edge (dried edges mean you'll have to start over, with the base coat step).
- Water-based glazes dry too fast, leaving very little open time to remove the glaze.
To slow down the drying, turn off the A/C or heater in the working area (if the weather permits, of course), and have an air humidifier running in the room. In addition, sponge your working surfaces with water beforehand, to stretch out the drying process even more.

- When sponge painting walls using the negative method, you are not limited to just pouncing motions to remove the glaze. You can also
occasionally drag the sponge over the glaze, to blend the colors
together. Also try rolling the sponge on the surface - that will create
yet another different and interesting finished effect.
- The more often you rinse the sponge, the more glaze you will remove, and the more underlying coat color will be revealed. But if you tend to let your sponge become full of paint before you rinse it, resume pouncing in an unobtrusive area (at the edges) after each cleaning - because the clean sponge will remove the most glaze, and create what looks like holes in your finish if you start in the middle.
Questions and Answers
About Sponge Painting Walls:
These posts should help with the most common DIY challenges and situations. Or, click here to ask your own question!
Choosing the Right Sea Sponge for Faux Painting: Wool, Grass or Cultured?
Question: I need to buy a sponge (I want to try my hand at positive sponging ), but when I looked online, they all look so different! The prices …
How to Prepare and Clean a Sponge for Faux Painting
Question: What should I do if my sea sponge leaves tiny pieces on fresh glaze? Also, is there a special way or product for cleaning sponges after …

What Paint Finish / Sheen is Best for Sponge Painting Techniques?
Question: I understand that when sponge painting, the finish of the base coat can be flat, satin or glossy (depending on our preference). But what …
What Paint Color Combinations Are Best for Sponging Techniques?
Question: What paint color combinations are best for sponge painting techniques?
Answer: The most harmonious and eye-pleasing sponged ON finishes …
How to Sponge Paint in the Corners and Tight Spaces
Question: How exactly do you sponge paint in the corners and other tight spaces? I'm afraid of making a mess and ruining my finish (and then I'll …
Tips for 2 and 3 Color Paint Sponging Applications
Question: Do you have any tips for creating paint sponging finishes in multiple colors?
Answer: The Tips and Tricks page and the actual tutorials …
Instructions for a Subtle, Barely There Sponge Painting Technique
Question: I want to create a subtle, barely-there sponge painting finish on my kitchen walls. I've already selected the colors, and I'm practicing …
Recommended:

Recommended:

See Also:
How to Sponge Paint ON the Walls
How to Sponge Paint OFF the Walls
Examples of Sponge Painting Techniques


Leave a Comment: