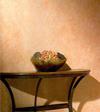
How to Sponge Paint
ON the Walls
The basic sponge paint technique is easy to learn even for first time DIYers, new to the world of decorative painting.
Here you just dab some glaze (or diluted paint) over the base coat with a natural sea sponge.
Sponging on is also called positive, or additive sponging, because with this method you use the sponge to apply the glaze to a surface - in other words, you add it, as opposed to removing it (like in many other faux painting techniques).

Positive sponge painting is a fairly quick process - you are only covering 30 to 80% of the surface.
Besides, the paint dries quickly and if needed, a second coat can usually be applied as soon as you have finished the first (if you start in the same place).
The finished effect of sponging can range from understated to dramatic, depending on the intensity of the chosen colors, and the number of colors you layer on.
But even when subtle, the result can be highly decorative.
In fact, it's best to be subtle with this technique because of how easy it is to overdo the inherent drama of positive sponge paint applications.
It All Starts With Sponging
Starting with simple sponging helps you learn and practice a number of important, fundamentals skills required in many other faux painting methods:

- mixing up decorative glaze
- estimating the quantity of ingredients needed
- selecting complementary paint colors for layering
- working with diluted paints and transparent mediums
- using unusual tools for applying and texturing coatings
- developing artistic coordination between your eye and hand
- maintaining a consistent pattern or randomly distributed imprints
- getting comfortable with different parts of the decorative painting process
...and when you muster up the courage to try your hand at glazing, parchment or even more advanced faux painting techniques such as granite or marble, you will have at least one less thing to learn (because the instructions for those finishes often include basic sponging).
The Keys to Successful
Sponge Paint Finishes
Even though sponging on is an easy technique, some thought is still necessary to create an attractive finished look.

Too many DIY sponging projects look gaudy and dated - the proof is all over the Internet!
So if you want this decorative treatment to look timeless, use the most care when choosing the paint colors.
But also consider the effect of different sheens - because these 2 factors can really make or break the result.
And finally, take the time to mix the proper recipe - the few minutes you spend on this step will also pay off beautifully in the end!
Colors

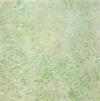
Sponging on can look crude and garish if the colors contrast too much.
But it's not enough just to avoid jarring contrasts - modern effective sponging keeps color contrasts to a minimum (just enough to produce a visible finish).
The beauty of sponge painting is in the textured effect, so the emphasis should be on subtle tonal variations and organic color combinations that imitate natural materials.

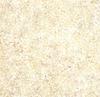
To keep the finish tasteful, stay within 1-2 shade range (darker/lighter) between the base coat and the overlay color(s).
Also, to avoid clashes and ensure the colors coordinate well, pick them from the same color family, or even from the same color strip (use different tones of the same color).
For example, a burgundy red shade will work great on a brick red
background, or a sandy beige tone sponged over a creamy beige will also
look harmonious.
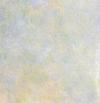
That same burgundy over cream?

Please don't, because the contrast is too high to look graceful (that's how sponge painting got a bad rap in the first place - remember those 80s overdone finishes?).
But there is an exception to every rule, and sometimes funky or contrasting color combinations can also work (for example, orange over pink or navy blue over gray).
You just really need to know what you are doing in terms of technique (contrasting colors make any application mistakes much more obvious), and have the right decor to support the flamboyant wall finish.
Finish
Unlike most other decorative wall painting techniques, additive sponging does not require a satin base coat (although it's easier to correct mistakes on) - so you can just as easily sponge over a flat finish paint without any problems.

In fact, anything glossier than satin as the base coat under this finish is not desirable, as it may be too slippery and cause the sponged on layer to sag.
The only thing to keep in mind here is that the same sheen in the base coat and the overlay coat(s) will produce a softer effect (and as you now know, subtle is always a good thing when it comes to sponging on).
Using two different sheens will add depth to the finish, but again it's easy to overdo this, so go with this option only when your base and overlay colors are, or nearly identical.
Recipe
One of the reasons why sponging on is a great beginner project is because it works great with water-based mediums - in other words, you don't need to use oil-based paints or glazes for your base coat or the top layers if you don't want to.

This is good news because latex and acrylic products are quicker to dry, less offensive to the nose, and much easier to clean up (albeit they look a bit more chalky and flat, compared to oil glazes).
But the common mistake many DIYers make is using paint straight out of a can to sponge over a base coat, and that's another explanation for their often messy, coarse and amateurish finishes.
You see, undiluted paint is just too thick and opaque to blend into the base coat color, and harder to work with as well.
So always use one of the glazing mixes below - you'll be surprised at the difference it makes:
- 2 parts latex paint + 1 part water (this is the easiest mixture to start experimenting with for beginners).
- 1 part latex paint + 1 part water (this concentration looks more delicate, but might feel too runny for newbies).
For an even softer, semi-transparent layer of color, mix:
- 1 part latex paint + 1 part water + 1 part clear glazing liquid (the glaze in the mixture will add more depth and luminance to the sponged finish).
Instructions for Single and Multi-Color
Positive Sponge Painting Techniques
You want to test your chosen color combination in real life and make sure you really like the effect, and to gain some confidence with the actual technique.
Also, it's best to start with the basic, 1-color sponging for your first project because all the other, more advanced sponge painting methods build on it.
How to Sponge Paint a Single Glaze Color - Basic Instructions
Positive sponging done in a single color is probably the easiest and quickest decorative finish to learn and create. It basically involves dipping a …

How to Sponge On a Single Glaze Color - Alternative Application
This sponging on method is a variation on the basic positive sponging technique (refer to it for a list of tools and materials, the glazing recipe and …
How to Sponge On with 2 Glaze Colors
Once you've successfully sponged on a single glaze color , you can stop there and enjoy the simple textured look of the finish. Or, you can build on …
Paint Instructions for Sponging On with 3 Glaze Colors
This version of the paint sponging technique results in an even denser finish than the 2-color sponging on method , so less of the base coat will show …
Tutorial for Random Sponge Painting in 4 Glaze Colors
This method involves a slightly different paint sponging technique - it's called "random" because of the loose arrangement of the strokes. The effect …
Dense One-Coat Sponge Painting Technique
Question: Is there a way to create a very dense sponging finish, without having to apply multiple layers of glaze? In other words, is it ok to just …

How to Create a Heavy, Dense Sponged Paint Finish
Question: If all sponged finishes are created using the same technique, how come they all look so different? I personally like the look of heavy, …
Recommended:

Recommended:

See Also:
How to Sponge Paint OFF the Walls
Tips and Tricks for Sponge Painting Walls
Examples of Sponge Painting Techniques


Leave a Comment: