Tips and Tricks for
Ragged and Rag Rolled
Faux Painting Finishes
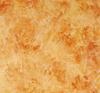
Ragged and rag rolled faux painting finishes are created by using a cloth to apply or lift off wet glaze, producing a smooth, elegant texture on the surface.
Rag painting is one of the easiest techniques, but still before you start your first ragging project, it's helpful to know some important guidelines, tips and tricks to make the process easier for you, and the results more rewarding.
NOTE: for specific step-by-step instructions, see "How to Faux Paint With a Rag" and "Negative Rag Painting" tutorials.
All Ragged Faux Painting Finishes
- Ragged patterns have more definition when dry than while wet - so do not panic if the color difference between the base coat and the top coat is not visible enough. Wait for the finish to dry, and the colors should look more distinct.

- Use only lint and fuzz-free material for your rags. Shake out and wash all new rags before using - to remove any remaining lint.
Also remember to use a cloth that doesn't have any loose or frayed edges, which can leave thread marks on your painted surface. You don't want deposits of little strands to mar your fresh faux painting finish. - For consistency, always use the same type and size of rag when you apply any ragging technique to a surface.
- You can reuse rags after they dry (If working with latex paints). Just drop all used rags into a bucket of
water, then wash them all at the end.
For alkyd paints though, you have to first dry and then safely discard all the rags you used for your project.

- To
transition cleanly from one wall to the next, tape along the corners of
alternate walls, and rag those walls first for efficiency. When dry,
transfer the tape and rag the other two.
- Don't wait too long to reload the rag, or the contrast between section joints will be too visible.
- Do not overwork the ragging - dab about 70-80% of the surface, and move on.
- The farther away you stand, the more even the effect will look. Check out your work the way it will actually be seen in real life conditions (don't scrutinize too closely).
Additive Ragged Faux Painting Finishes
- Be careful not to rotate the rag on the surface, or the glaze will smear.

- To keep the pattern looking subtle and natural, do not push the rag too hard onto the surface.
- Rinse the rag often if you want a crisp, crushed design.
- Step back regularly to check your work, and if necessary, fill
in the gaps/breaks or areas that are too light with a little more color.
- If you still miss some spots (especially in the corners and
edges), you can touch them up later with an artist's brush, even if the
finish has already dried.
- If the final effect looks uneven, you can correct that by ragging on a second coat in a different shade of the same color, or in a second, complementing color.
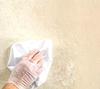
Subtractive Ragged Faux Painting Finishes
- A glazing liquid must always be added to the paint for ragging off, because the surface must stay wet long enough for you to manipulate the glaze with the rag, and the glazing liquid helps with that.

- To extend the open time a little more, you might want to use a
semi-gloss finish for the base coat. This will give you more time to
remove the glaze, but the overall final effect will be shinier than with
a satin finish base coat.
- Timing is critical with creating most
negative/subtractive faux painted finishes, because the glaze can be
rolled on more quickly than
it can be lifted off. Experiment beforehand to determine how large a
section you and your partner can work on at one time, taking skill into
consideration.
- Never stop halfway down the wall or in the middle, or you will
get dark overlapping lines of color. If this does occur, you have to
redo the whole wall.
Set aside the time to do an entire wall in one session so that the leading edge will be wet when you paint the adjacent section. - Work on small areas at a time, or the glaze may dry before you get to it.
- You must keep a wet edge at all times. Also, it's best to start a new
section a little beyond the wet edge and work back into it. This trick
keeps the joints between sections from developing an unwanted dark line.
- If the leading edge has started to dry up, the best way to re-wet it is with some clear faux glaze (not the colored glaze mix).

- If you've loaded too much paint on the roller, remove the
excess before rolling the glaze on
the wall - that will prevent drips and uneven glaze build up.
- Instead of rolling on the glaze, you can use a paint brush and
make vertical and horizontal criss-cross strokes to lay the glaze over
the working section. This multiple stroking sets and levels the glaze, so it doesn't build-up unevenly or run.
- While the glaze is still wet, you can go over a section that
may be too dense with glaze, using a clean cloth to even out the
pattern.
- For a softer look, you can gently stroke the tips of a shoe
brush over the ragged-off area in a haphazard fashion (it's called stippling). Do this
immediately after ragging each section.
- Keep in mind that just like other negative faux painting finishes, ragging off requires you to use - and then remove - a larger quantity of paint/glaze than you would for most positive techniques. So round up material estimates and purchase your supplies accordingly.
Rag Rolled Faux Painting Finishes
- Most packaged rags are about 2 feet square. If this size makes a
roll that is too long for you to handle comfortably, cut them down.

- You don't have to roll the rag in one continuous motion from
bottom to top. You can lift it, rearrange the roll, and reposition it
whenever you like.
- If you want to break up the linear pattern of traditional rag
rolled faux paint finishes, you can use a short rag instead, or even a bunched up rag, and roll
it in random directions on the surface (not just up or down).
- To create a fantasy marble effect, try rolling the rag diagonally on the wall, instead of vertically.
- If the pattern appears uneven, retouch it by pouncing small areas lightly with the rolled rag.
Questions and Answers
About Rag Painting:
Click here for help! And in the meantime, here's some more guidance for different aspects of this technique:
What Paint Color Combinations Are Best for Faux Ragging Finishes?
Question: What are the best paint/glaze color combinations for faux ragging finishes? Also, when rag painting, does the base coat has to be the lighter …
How to Prepare, Fold and Hold a Cloth for Faux Rag Painting
Question: How do you hold the cloth when rag painting? When I practice on sample boards, the imprints look different depending on how I bunch it up. …

How to Choose the Right Material for Faux Rag Painting?
Question: What type of material is best for faux rag painting techniques? Cotton? Cheesecloth? Or maybe there's no difference at all and I'm making …
Recommended:

Recommended:

See Also:
Negative Rag Painting: How-to Tutorials
Examples of Ragging Faux Finish Techniques


Leave a Comment: